ftpsfs howto

Author: stephan  |  Category: Linux, Netzwerk

[lang_de]
Ich habe ein kleines NAS das ich bisher immer als Samba Share gemounted hatte. Da dies aber immer wieder Probleme machte habe ich nach einer neuen Möglichkeit gesucht .
Eine sehr schöne und einfache Variante ist mir curlftpfs untergegkommen .
Es wird das Packet curlftpfs benötigt ( Abhängigkeiten zu libfuse2 (FUSE=FileSystem im Userspace ))
Danach kann das ganze einfach gemounted werden
curlftpfs -o nonempty admin:passwort@192.168.1.91/PUBLIC/ /mount/
oder gar in die FSTAB integriert werden
curlftpfs#admin:passwort@192.168.1.91 /mount fuse rw,uid=500,user,noauto 0 0

[/lang_de]

[lang_en]
I own a little NAS which was mounted as samba share. This was not always sucessfull so I was looking for another way.
There ist a very nice alternative by using curlftpfs
I need the packet curlftpfst ( dependencies to libfuse2 (FUSE=FileSystem in Userspace ))
After installing you can mount it very easily
curlftpfs -o nonempty admin:passwort@192.168.1.91/PUBLIC/ /mount/
or integrate it even into fstab
curlftpfs#admin:passwort@192.168.1.91 /mount fuse rw,uid=500,user,noauto 0 0

[/lang_en]

Windows Sound remixes

Author: stephan  |  Category: Sonstiges, windows

[lang_de]
Es gibt Menschen, die aus Windows Fehlermeldungssound und ein bischen Beat ware Kunstwerke der elektronsichen Musik 🙂 komponieren.
Eine nicht repräsentative Auswahl möchte ich hier vorstellen


Eins noch zu den typischen ICQ Sounds

[/lang_de]
[lang_en]
There are people out there mixing fascinating pieces of music out of the typical Windows error sounds and some beat.
Some of them I would like to present


Another one with the typical ICQ Sounds

[/lang_en]

Empörung und die Entlassung des ZDF Chefredakteurs Brender

Author: stephan  |  Category: Sonstiges, Weltgeschehen

Ich habe die Diskussion über die nicht erfolgte Vertragsverlängerung des ZDF Chefredakteurs Brender sehr aufmerksam verfolgt und bin nicht einverstanden mit diesem Vorgang .

Erstaunt war ich allerdings über die Welle der Empörung die durch die Medien schwappte. Das das öffentlich rechtliche Fernsehen schon immer unter direktem Einfluss der Politik stand fand nicht wirklich Beachtung.

Und dann ist mir ein Zitat frei nach Hagen Rether in den Sinn gekommen.

Empörend. Wir werden gar nicht mehr selber empört, wir müssen empört werden. Permanent. Wir kriegen immer neue Sachen raus. Vor 3 Wochen haben wir rausgekriegt, dass das ZDF seit 46 Jahren unter dem Enfluss der Politik steht. Das schreit nach einem Untersuchungsausschuss.

cygwin with sshd and windows 7

Author: stephan  |  Category: Linux, Netzwerk, windows

[lang_de]
was ist cygwin ?
Cygwin ist ein Toolset das das starten POSIX kompatible Programme unter Windows ermöglich. So ist es unter Windows möglich zu greppen oder den vi zu nutzen.
Es ist auch möglich , den sshd für remote access zu nutzen.

Um cygwin unter Windows 7 zu nutzen wird das neuste release benötigt . ich nutze version 1.7 , zwar noch Beta aber stabil.

Der Installationsdialog ist ähnlich zu den meisten Linuxdistribitionen. Man kann die Packete aussuchen , die man mag, sollte aber den sshd nicht vergessen.

Nach der Installation öffnet man eine neue shell und gibt das folgende ein
ssh-host-config -y
Wenn die Konfiguration das folgende verlangt „CYGWIN=“ sollte man dies eingeben:
tty ntsec
Der Dienst wird dann mit
cygrunsrv -S sshd
gestartet. Die Firewall muss natürlich eingehende ssh Verbindungen akzeptieren.
[/lang_de]
[lang_en]
What is cygwin ?
Cygwin is a set of tools to add POSIX compability to a Windows System. Imagine, you can grep and less and use vi and the Basic System is Windows system.
You can also install a sshd for remote access.

To install cygwin under windows7 , you need the newest release . I used version 1.7 , Beta but stable.

The installation dialog is similar to most linux distributions. Choose the packets you want but don’t forget the sshd.

After the installation is finished open a shell and do the following
ssh-host-config -y
When prompted with „CYGWIN=“ type for following:
tty ntsec
Then you can start it with.
cygrunsrv -S sshd
Be shure that your Firewall accepts incomming ssh connections.
[/lang_en]

virtual WLAN

Author: stephan  |  Category: Linux, Netzwerk, openwrt, Sonstiges

[lang_en]After failing to configure more than one wlan onto my new wrt160nl, I’ll tried the same with my old wrt54gl.
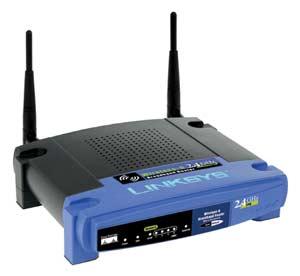
wrt54gl

The setup:
-One WLAN ( secure ) ,directly connected to my LAN
-One WLAN ( unsecure) , for testingpurpose only for a few hosts. This net wil be routed to the LAN.
The accessiblity will be managed by the Firewall and my dhcpd

The second wlan will simply added to /etc/config/wireless ( same physical interface)

config wifi-device wl0
option type broadcom
option channel 7
config wifi-iface
option device wl0
option network lan2
option mode ap
option ssid lulu
option encryption none
option hidden 1
option dns 192.168.1.1
option gateway 192.168.3.2
option dhcp 192.168.1.1
config wifi-iface
option device wl0
option network lan
option mode ap
option ssid lala
option encryption psk
option key secret
option hidden 1
option dns 192.168.1.1
option gateway 192.168.1.1
option dhcp 192.168.1.1

after a „wifi down && wifi up“ you’ll now see Interface wl0.1.
I had two change the following in the /etc/config/network
-I need a new vlan ( 2) . The Vlan1 was for the WAN Interface, the physical interface is now in VLAN 0 ( LAN) so I have 5 Interfaces for the LAN.
-For both WLANs you have to configure the bridge interfaces.
-under /etc/firewal.user you have to adapt the firewall .


#### VLAN configuration
config switch eth0
option vlan0 "0 1 2 3 4 5*"
option vlan1 "5*"
option vlan2 "5*"
#### Loopback configuration
config interface loopback
option ifname "lo"
option proto static
option ipaddr 127.0.0.1
option netmask 255.0.0.0
#### LAN configuration
config interface lan
option type bridge
option ifname "eth0.0"
option proto static
option ipaddr '192.168.1.98'
option netmask 255.255.255.0
option gateway '192.168.1.1'
option dns '192.168.1.1'
##### VLAN 2 , Bastenwlan
config interface lan2
option type bridge
option ifname "eth0.2"
option proto static
option ipaddr '192.168.3.2'
option netmask '255.255.255.0'
option dns '192.168.1.1'
option dhcp '192.168.1.1'

thats all
[/lang_en][lang_de]
Nachdem ich scheiterte, dem WRT160NL mehr wie ein Wlan beizubringen . Deswegen stürzte ich mich auf meinen alten Router WRT54gl und siehe da, es geht doch.

wrt54gl

Das Szenario:
-Ein WLAN ( sicher ) ,das direkt mit dem LAN verbunden ist
-Ein WLAN ( unsicher) , für Testzwecke, das in das Haupnetz geroutet wird und nur wenigen ausgesuchten Hosts offensteht ( durch den dhcp und die Firewall geregelt )

Unten die /etc/config/wireless in der das zweite wlan einfach hinzugefügt wird ( gleiches physkalisches Interface)


config wifi-device wl0
option type broadcom
option channel 7
config wifi-iface
option device wl0
option network lan2
option mode ap
option ssid lulu
option encryption none
option hidden 1
option dns 192.168.1.1
option gateway 192.168.3.2
option dhcp 192.168.1.1
config wifi-iface
option device wl0
option network lan
option mode ap
option ssid lala
option encryption psk
option key secret
option hidden 1
option dns 192.168.1.1
option gateway 192.168.1.1
option dhcp 192.168.1.1

nach einenm wifi down && wifi up ist nun das Interface wl0.1 entstanden.
In der /etc/config/network ist folgendes zu ändern.
-Ein neues vlan ( 2) ist anzulegen. Das Vlan1 war für das WAN Interface, da physikalischen Interface ist aber nun im VLAN 0 ( LAN). So habe ich in meinem WLAN 5 Interfaces
-Für die Beiden WLANs werden die beiden Bridge Interfaces konfiguriert.
-unter /etc/firewal.user ist noch die Firewall anzupassen.


#### VLAN configuration
config switch eth0
option vlan0 "0 1 2 3 4 5*"
option vlan1 "5*"
option vlan2 "5*"
#### Loopback configuration
config interface loopback
option ifname "lo"
option proto static
option ipaddr 127.0.0.1
option netmask 255.0.0.0
#### LAN configuration
config interface lan
option type bridge
option ifname "eth0.0"
option proto static
option ipaddr '192.168.1.98'
option netmask 255.255.255.0
option gateway '192.168.1.1'
option dns '192.168.1.1'
##### VLAN 2 , Bastenwlan
config interface lan2
option type bridge
option ifname "eth0.2"
option proto static
option ipaddr '192.168.3.2'
option netmask '255.255.255.0'
option dns '192.168.1.1'
option dhcp '192.168.1.1'

thats all
[/lang_de]

Howto let Nagios send documentationlinks

Author: stephan  |  Category: Linux, Nagios, Netzwerk

[lang_en]
If you use Nagios to monitor a lot of services and hosts , you want to link the Dokumentation to nagios and you want to see the Link also in the Notification email.

Whats the way to achieve this??

You can define a special Section in the configuration for Extended Information about Services . Into this section you have to put a Variable „action_url“ with the URL of your dokulink, Than you’ll find the Link on the webpage

define serviceextinfo{
host_name localhost
service_description some service
action_url http://link.to.doku
}

To see the Link also in the eMail you have to put the following


...
$SERVICEACTIONURL$ \n
...

into your notifcation Command.

2 additional notes:
1.)This will also work by using $SERVICENOTESURL$ but $SERVICENOTESURL$ is used by tools like nagiosgrapher. So use $SERVICEACTIONSURL$
2.)This will also work for $HOSTACTIONURL$
[/lang_en] [lang_de]
Wenn man nagios einsetzt um sehr viele Hosts und Dienste zu überwachen , wäre es schön wenn der Nagios im Störungsfall gleich die Doku zum enstprechenden Dienst mit verschickt.

Ich stand genau vor diesem Problem und habe nun diese Lösung gefunden .

Zur Konfiguration des Services wird nun eine Erweiterungsektion zum Service hinugefügt. In diese Sektion kommt eine Variable action_url mit einem Link auf die Doku.
Dann wird dieser Link auf jeden Fall schon auf Weboberfläche angezeigt.


define serviceextinfo{
host_name localhost
service_description some service
action_url http://link.to.doku
}

Damit er auch noch in der Mial zu sehen ist muss dem/den Notofikationkommando(s) noch folgendes hinzugefügt werden.

...
$SERVICEACTIONURL$ \n
...

Zwei Ergänzungen:
1.) Es wurde auch ,mit der Variable $SERVICENOTESURL$ funktionieren, die wird allerdings auch von Addons wie dem Nagiosgrapher genutzt.
2.)Für Hosts funktioniert das ganze gleich, da heisst die Variable $HOSTACTIONURL$
[/lang_de]

Rework of my Blog

Author: stephan  |  Category: Sonstiges


Habe dem Blog ein neues Design verpasst (http://www.retromania.jayhafling.com/) und baue gerade die Fähigkeit zur Mehrsprachigkeit ein.
Ein Teill der alten Artikel wird auch übersetzt


I gave the blog a new design (http://www.retromania.jayhafling.com/) and working now on multilingal support.
Some of the old article I also will translate

Chinareise

Author: stephan  |  Category: Sonstiges, Unterwegs

Von der Reise, die ich mit meiner Frau nach China machte , möchte ich hier die schönsten Photos von der Mauer, aus Peking, aus Shanghai und aus Suzhou präsentieren.

Ein neuer WLAN Router – der WRT160NL

Author: stephan  |  Category: Linux, Netzwerk, openwrt

Aus verschiedenen Gründen ( Speicher , Gigabit Ports ,.. ) und weil ich einfach auch ein Bastelwlan haben wollte ( das sollte dann der alte Router werden ) musste ein neuer Router her.
Eigentlich wollte ich ja einen , der zwei WLAns simultan kann egal ob physikalisch oder als virtueller Access Point.
Ausserdem sollte am besten Openwrt drauf laufen .
Diesen Alleskönner schien es nicht zu geben weswegen ich einen wrt160N bestellte.
Bekommen hatte ich allerdings einen wrt160NL.

Der Unterschied zwischen den Geräten erschloss sich mir erst beim Stöbern in der englischen wikipedia .
Der wrt160NL hat einen Atheroschip, dies kann VAP ermöglichen !!

Momentan bin ich nach diesem howto dabei, die Firmware zu bauen

Meine bisherigen Schritte

mkdir OpenWrt
cd OpenWrt/
svn co svn://svn.openwrt.org/openwrt/trunk/
cd trunk
svn up

sollte eine Versionsnummer von r17264 oder größer sein

./scripts/feeds update
make defconfig
make package/symlinks
make menuconfig

Im Menü habe ich als Target System ar71xx und als Target Profil wrt160nl eingestellt.
Momentan läuft das

make

noch

Cotton Club Shanghai

Author: stephan  |  Category: Unterwegs, Weltgeschehen

Der Cottonclub ist einer der bekanntesten Jazzclubs in Shanghai mit eigener Hausband ( multikulturell besetzt )und Liveperformace jeden Nacht .

Um hinzukommen mußten wir dem Taxifahrer ersteinmal die Adresse übermitteln ( der Club ist außerhalb ) die Adresse klarmachen .
Dazu wurde dieses Bild

auf ein Handy geladen und den Taxifahrer gezeigt.

Wir kamen tatsächlich an und konnten Cocktails und Jazz vom feinsten genießen.

Einfach zurücklehnen und genießen