Ein kurzer Vergleich zwischem freiem offenen WLAN in Deutschland und in Hongkong

Author: stephan  |  Category: openwrt, Philosophie, Sonstiges, Unterwegs, Weltgeschehen
    Deutschland

Zumindest auf Unterlassung kann derjenige jedoch verklagt werden, hat der BGH nun entschieden, nicht jedoch auf Schadensersatz. Das Urteil verpflichtet alle Anschlussinhaber, dass ihr WLAN-Anschluss durch „angemessene Sicherungsmaßnahmen vor der Gefahr geschützt ist, von unberechtigten Dritten zur Begehung von Urheberrechtsverletzungen missbraucht zu werden“.

    HongKong

Der „Staat“ HongKong betreibt ein eigenes offenes Wlan mit 2000 hotspots in 350 Regierungsgebäuden, Sport und Erholungszentren sowie drei öffentlichen Parks .

Ein faszinierender Kulturunterschied über den sich jeder selber Gedanken machen kann

Last but not least – a redundant internet connection (Part 4)

Author: stephan  |  Category: Linux, Netzwerk, openwrt

[lang_en]
myNetz
foreword
1.) You need at least 2 Linux Boxes for this. I used my OpenSuse Server with the VDSL Connection and the wrt160NL with Openwrt and UMTS/3G for this. 2 Openwrt Boxes are also suitable
2.) On Openwrt 10.03 I had Problems with Quagga-vtysh so I don’t used it
( On the Suse Box vtysh was working fine)
Main
First you have to install the Quagga Packets. For OpenWRT install

opkg install quagga quagga-libospf quagga-libzebra quagga-ospfd

For the second box please refer to the manual of your distribution.
If you don’t install vtysh , you can access to different consoles with
telnet 127.0.0.1 zebra (2601)
telnet 127.0.0.1 ospfd (2601)

For our case the interesting part is the ospf Configuration
router ospf
router ospf
ospf router-id 192.168.1.254
redistribute kernel
redistribute connected
network 192.168.1.0/24 area 0.0.0.0
neighbor 192.168.1.1
!
!

And the Configuration of the Suse Box

router ospf
ospf router-id 192.168.1.1
redistribute kernel
network 192.168.1.0/24 area 0.0.0.0
neighbor 192.168.1.254
!

Now let us check the routing table on both Boxes
suse# sh ip ro
Codes: K - kernel route, C - connected, S - static, R - RIP, O - OSPF,
I - ISIS, B - BGP, > - selected route, * - FIB route

O 0.0.0.0/0 [110/200] via 192.168.1.254, eth1, 00:04:37
K>* 0.0.0.0/0 is directly connected, dsl0

openwrt# sh ip ro
Codes: K - kernel route, C - connected, S - static, R - RIP, O - OSPF,
I - ISIS, B - BGP, H - HSLS, L - OLSR, M - BATMAN, > - selected route, * - FIB route

O 0.0.0.0/0 [110/200] via 192.168.1.1, br-lan, 00:00:48
K>* 0.0.0.0/0 is directly connected, ppp0

Both Router had their own defaultroutes and the Defaultroute of each other via ospf.
Has one router lost its connection , it has still the one of his neighbor

Source
http://www.taunusstein.net/index.php?option=com_content&view=article&id=62:routing&catid=15:linux
[/lang_en]

[lang_de]
myNetzVorwort
1.) Man benötigt mindestens 2 Linuxrechner dafür . Ich habe meinen Linuxserver mit Opensuse und der VDSL Leitung und den wrt160nl mit Openwrt und UMTS verwendet. Mit zwei Openwrtmaschinen funktioniert es aber genau so.
2.) Mit Openwrt 10.03 gab es mit der vtysh Problem, deswegen habe ich sie weggelassen ( Unter OpenSuse gab es keine Probleme mit der vtysh

Haupteil
Als erstes muss Quagga installiert werden. Für OpenWRT muss folgendes installiert werden

opkg install quagga quagga-libospf quagga-libzebra quagga-ospfd

Für die zweite Maschine verweise ich auf die Dokumenation der jeweiligen Distribution
Wenn man vtysh nicht installiert kann man die einzelnen Konsolen folgendermassen erreichen
telnet 127.0.0.1 zebra (2601)
telnet 127.0.0.1 ospfd (2601)

In unserem Fall ist die OSPF Konfiguration das Interessante


router ospf
ospf router-id 192.168.1.1
redistribute kernel
network 192.168.1.0/24 area 0.0.0.0
neighbor 192.168.1.254
!

Und die Konfiguration des zweiten Router
router ospf
router ospf
ospf router-id 192.168.1.254
redistribute kernel
redistribute connected
network 192.168.1.0/24 area 0.0.0.0
neighbor 192.168.1.1
!
!

Nun lasst uns die Routingtable anschauen
suse# sh ip ro
Codes: K - kernel route, C - connected, S - static, R - RIP, O - OSPF,
I - ISIS, B - BGP, > - selected route, * - FIB route

O 0.0.0.0/0 [110/200] via 192.168.1.254, eth1, 00:04:37
K>* 0.0.0.0/0 is directly connected, dsl0

openwrt# sh ip ro
Codes: K - kernel route, C - connected, S - static, R - RIP, O - OSPF,
I - ISIS, B - BGP, H - HSLS, L - OLSR, M - BATMAN, > - selected route, * - FIB route

O 0.0.0.0/0 [110/200] via 192.168.1.1, br-lan, 00:00:48
K>* 0.0.0.0/0 is directly connected, ppp0

Beide Router haben ihre eigene Kernel Defaultroute und die jeweils andere Defaultroute via OSPF.
Verliert einer der Router seine eigene Verbindung hat er noch die Defaultroute des Nachbarrouters

Quelle
http://www.taunusstein.net/index.php?option=com_content&view=article&id=62:routing&catid=15:linux

[/lang_de]

Installing 3G/UMTS ( Huawei e220 ) onto WRT 160nl and Openwrt(Part 3)

Author: stephan  |  Category: Linux, Netzwerk, openwrt

[lang_en]

First we need to install a bunch of packets

opkg install kmod-ar9170 kmod-usb-core kmod-usb-serial comgt kmod-usb-uhci kmod-usb2 kmod-ppp huaweiaktbbo

The E220 has two modes . To switch from USB Stick to UMTS you need huaweiaktbbo

root@OpenWrt:~# huaweiAktBbo
Searching modem...found supported modem!
Modem poked!

Its a clever idea to put it into init.d for startup. I used this script by Simon Josefsson


root@OpenWrt:/etc/init.d# cat huaweiAktBbo
#!/bin/sh /etc/rc.common
# Written by Simon Josefsson 2009-03-05. Released into the public domain.

START=70
start() {
huaweiAktBbo
}

Make the script accessible and enable it
And you need the following

root@OpenWrt:/# cat /etc/modules.d/60-usb-serial
usbserial vendor=0x12d1 product=0x1003

Then Reboot the Router

Next step ist to get ppp working. My working scripts ( I had a few tries before I found a working config)

root@OpenWrt:/# cat /etc/chatscripts/3g.chat
ABORT BUSY
ABORT 'NO CARRIER'
ABORT ERROR
REPORT CONNECT
TIMEOUT 10
"" "ATX"
OK "ATQ0 V1 E1 S0=0 &C1 &D2 +FCLASS=0"
OK 'AT+CGDCONT=1,"IP","$USE_APN","0.0.0.0"'

SAY "Calling UMTS/GPRS"
TIMEOUT 30
#OK "ATD*99***1#"
OK "ATD*99#"
CONNECT ' '


root@OpenWrt:/# cat /etc/ppp/options
115200
logfile /dev/null
noaccomp
nopcomp
nocrtscts
lock
maxfail 0
lcp-echo-failure 0
lcp-echo-interval 0
ipcp-max-failure 30


root@OpenWrt:/# cat /etc/config/network
...
#### UMTS configuration
config interface ppp0
option ifname ppp0
option proto 3g
option device /dev/ttyUSB0
option 'service' 'umts'
option apn internet.eplus.de
option pincode 0000
option 'defaultroute' '1'
option 'peerdns' '1'

With an ifup ppp0 , the 3G modem should start connecting

My Sources
http://www.it-slav.net/blogs/2010/06/12/howto-use-3g-dongle-huawei-e1750-in-openwrt/
http://josefsson.org/openwrt/dongle.html

[/lang_en]
[lang_de]

Zuerst benötigen wir eine Menge Packete

opkg install kmod-ar9170 kmod-usb-core kmod-usb-serial comgt kmod-usb-uhci kmod-usb2 kmod-ppp huaweiaktbbo

Das E220 hat Zwei Modi .
Um vom USB STick zum Modem zu wechseln benötigt man das Program huaweiaktbbo

root@OpenWrt:~# huaweiAktBbo
Searching modem...found supported modem!
Modem poked!

es ist jetzt eine gute Idee , das ganze via Startup zu automatisieren.
Ich verwende hierfür das Script von Simon Josefsson


root@OpenWrt:/etc/init.d# cat huaweiAktBbo
#!/bin/sh /etc/rc.common
# Written by Simon Josefsson 2009-03-05. Released into the public domain.

START=70
start() {
huaweiAktBbo
}

Das Script sollte man nun ausführbar machen und enablen damit es bei jedem Start wieder ausgeführt wird

Und man braucht das folgende

root@OpenWrt:/# cat /etc/modules.d/60-usb-serial
usbserial vendor=0x12d1 product=0x1003

Danach den Router neu starten

Der nächste Schritt ist den PPP zum Laufen zu bekommen . Anbei meine funktionierenden scripte ( Ich habe ein bischen probieren müssen bevor es lief)


root@OpenWrt:/# cat /etc/chatscripts/3g.chat
ABORT BUSY
ABORT 'NO CARRIER'
ABORT ERROR
REPORT CONNECT
TIMEOUT 10
"" "ATX"
OK "ATQ0 V1 E1 S0=0 &C1 &D2 +FCLASS=0"
OK 'AT+CGDCONT=1,"IP","$USE_APN","0.0.0.0"'

SAY "Calling UMTS/GPRS"
TIMEOUT 30
#OK "ATD*99***1#"
OK "ATD*99#"
CONNECT ' '


root@OpenWrt:/# cat /etc/ppp/options
115200
logfile /dev/null
noaccomp
nopcomp
nocrtscts
lock
maxfail 0
lcp-echo-failure 0
lcp-echo-interval 0
ipcp-max-failure 30


root@OpenWrt:/# cat /etc/config/network
...
#### UMTS configuration
config interface ppp0
option ifname ppp0
option proto 3g
option device /dev/ttyUSB0
option 'service' 'umts'
option apn internet.eplus.de
option pincode 0000
option 'defaultroute' '1'
option 'peerdns' '1'

Mit einem ifup ppp0 ,sollte das UMTS Modem anfangen sich zu verbinden

Meine Quellen
http://www.it-slav.net/blogs/2010/06/12/howto-use-3g-dongle-huawei-e1750-in-openwrt/
http://josefsson.org/openwrt/dongle.html

[/lang_de]

Another try with the wrt160nl and openwrt(Part 2) – Installing virtual WLANs

Author: stephan  |  Category: Linux, Netzwerk, openwrt

[lang_en]

The next goal was the Konfiguration of two „virtual“ WLANs on one physical router ; one private and protected WLAN and one open for Guests ( otherwise protected )

The Code is very simple :

config wifi-iface
option device radio0
option network lan
option mode ap
option ssid Secret-WLAN
option encryption psk
option key Secret
option hidden 1

config wifi-iface
option device radio0
option network lan2
option mode ap
option ssid OpenWLAN
option encryption none
option hidden 1

At last , you need a virutal ethernetdevice as bridiging point for the Second WLAN

config interface lan2
option ifname eth0.2
option type bridge
option proto static
option ipaddr 172.27.1.1
option netmask 255.255.255.0

[/lang_en]

[lang_de]

Der nächste Schritt war die Konfiguration zweier virtueller WLANs auf einem physikalischen Accesspoint ; ein geschützes für private Zwecke und ein offenes für Gäste ( auf anderem Weg geschützt)

Die Konfiguration ist sehr einfach:

config wifi-iface
option device radio0
option network lan
option mode ap
option ssid Secret-WLAN
option encryption psk
option key Secret
option hidden 1

config wifi-iface
option device radio0
option network lan2
option mode ap
option ssid OpenWLAN
option encryption none
option hidden 1

man braucht jetzt nur noch eine virtuelles Ethernet Device für die Bridge

config interface lan2
option ifname eth0.2
option type bridge
option proto static
option ipaddr 172.27.1.1
option netmask 255.255.255.0

[/lang_de]

Another try with the wrt160nl and openwrt (Part 1) – Installing Openwrt

Author: stephan  |  Category: Linux, Netzwerk, openwrt

[lang_en]

After being unused for over an year I gave the WRT 160 NL another try .
Now there are images ready to use[1]
You can easily flash the image over an older installation ( in my case ) this way
sysupgrade -n openwrt-ar71xx-wrt160nl-squashfs.bin
or you can do it with the webgui.

To get WLAN wokring , you have to install additional packets
opkg update; opkg install kmod-ath9k hostapd wpa-supplicant
and then you have to do the following

rm /etc/config/wireless
wifi detect > /etc/config/wireless

and WLAN is working

[1]
http://downloads.openwrt.org/backfire/10.03/ar71xx/
[/lang_en]

[lang_de]
Nachdem der Router ein Jahr lang unnütz in der Ecke stand gab ich ihm eine weitere Chance.
Inzwischen gibt es auch jede Menge fertiger images [1]

Der Schnellste Weg zur Installation ist mit dem Befehl ( bei alten Instaallationen wie in meinem Fall)
sysupgrade -n openwrt-ar71xx-wrt160nl-squashfs.bin
oder über die Weboberfläche

Um Wlan zum Laufen zu Bringen müssen ein paar Packete installiert werden
opkg update; opkg install kmod-ath9k hostapd wpa-supplicant
und dann das Wlan mit den Befehlen

rm /etc/config/wireless
wifi detect > /etc/config/wireless

einrichten und WLAN funktioniert

[1]
http://downloads.openwrt.org/backfire/10.03/ar71xx/
[/lang_de]

virtual WLAN

Author: stephan  |  Category: Linux, Netzwerk, openwrt, Sonstiges

[lang_en]After failing to configure more than one wlan onto my new wrt160nl, I’ll tried the same with my old wrt54gl.

wrt54gl

The setup:
-One WLAN ( secure ) ,directly connected to my LAN
-One WLAN ( unsecure) , for testingpurpose only for a few hosts. This net wil be routed to the LAN.
The accessiblity will be managed by the Firewall and my dhcpd

The second wlan will simply added to /etc/config/wireless ( same physical interface)

config wifi-device wl0
option type broadcom
option channel 7
config wifi-iface
option device wl0
option network lan2
option mode ap
option ssid lulu
option encryption none
option hidden 1
option dns 192.168.1.1
option gateway 192.168.3.2
option dhcp 192.168.1.1
config wifi-iface
option device wl0
option network lan
option mode ap
option ssid lala
option encryption psk
option key secret
option hidden 1
option dns 192.168.1.1
option gateway 192.168.1.1
option dhcp 192.168.1.1

after a „wifi down && wifi up“ you’ll now see Interface wl0.1.
I had two change the following in the /etc/config/network
-I need a new vlan ( 2) . The Vlan1 was for the WAN Interface, the physical interface is now in VLAN 0 ( LAN) so I have 5 Interfaces for the LAN.
-For both WLANs you have to configure the bridge interfaces.
-under /etc/firewal.user you have to adapt the firewall .


#### VLAN configuration
config switch eth0
option vlan0 "0 1 2 3 4 5*"
option vlan1 "5*"
option vlan2 "5*"
#### Loopback configuration
config interface loopback
option ifname "lo"
option proto static
option ipaddr 127.0.0.1
option netmask 255.0.0.0
#### LAN configuration
config interface lan
option type bridge
option ifname "eth0.0"
option proto static
option ipaddr '192.168.1.98'
option netmask 255.255.255.0
option gateway '192.168.1.1'
option dns '192.168.1.1'
##### VLAN 2 , Bastenwlan
config interface lan2
option type bridge
option ifname "eth0.2"
option proto static
option ipaddr '192.168.3.2'
option netmask '255.255.255.0'
option dns '192.168.1.1'
option dhcp '192.168.1.1'

thats all
[/lang_en][lang_de]
Nachdem ich scheiterte, dem WRT160NL mehr wie ein Wlan beizubringen . Deswegen stürzte ich mich auf meinen alten Router WRT54gl und siehe da, es geht doch.

wrt54gl

Das Szenario:
-Ein WLAN ( sicher ) ,das direkt mit dem LAN verbunden ist
-Ein WLAN ( unsicher) , für Testzwecke, das in das Haupnetz geroutet wird und nur wenigen ausgesuchten Hosts offensteht ( durch den dhcp und die Firewall geregelt )

Unten die /etc/config/wireless in der das zweite wlan einfach hinzugefügt wird ( gleiches physkalisches Interface)


config wifi-device wl0
option type broadcom
option channel 7
config wifi-iface
option device wl0
option network lan2
option mode ap
option ssid lulu
option encryption none
option hidden 1
option dns 192.168.1.1
option gateway 192.168.3.2
option dhcp 192.168.1.1
config wifi-iface
option device wl0
option network lan
option mode ap
option ssid lala
option encryption psk
option key secret
option hidden 1
option dns 192.168.1.1
option gateway 192.168.1.1
option dhcp 192.168.1.1

nach einenm wifi down && wifi up ist nun das Interface wl0.1 entstanden.
In der /etc/config/network ist folgendes zu ändern.
-Ein neues vlan ( 2) ist anzulegen. Das Vlan1 war für das WAN Interface, da physikalischen Interface ist aber nun im VLAN 0 ( LAN). So habe ich in meinem WLAN 5 Interfaces
-Für die Beiden WLANs werden die beiden Bridge Interfaces konfiguriert.
-unter /etc/firewal.user ist noch die Firewall anzupassen.


#### VLAN configuration
config switch eth0
option vlan0 "0 1 2 3 4 5*"
option vlan1 "5*"
option vlan2 "5*"
#### Loopback configuration
config interface loopback
option ifname "lo"
option proto static
option ipaddr 127.0.0.1
option netmask 255.0.0.0
#### LAN configuration
config interface lan
option type bridge
option ifname "eth0.0"
option proto static
option ipaddr '192.168.1.98'
option netmask 255.255.255.0
option gateway '192.168.1.1'
option dns '192.168.1.1'
##### VLAN 2 , Bastenwlan
config interface lan2
option type bridge
option ifname "eth0.2"
option proto static
option ipaddr '192.168.3.2'
option netmask '255.255.255.0'
option dns '192.168.1.1'
option dhcp '192.168.1.1'

thats all
[/lang_de]

Ein neuer WLAN Router – der WRT160NL

Author: stephan  |  Category: Linux, Netzwerk, openwrt

Aus verschiedenen Gründen ( Speicher , Gigabit Ports ,.. ) und weil ich einfach auch ein Bastelwlan haben wollte ( das sollte dann der alte Router werden ) musste ein neuer Router her.
Eigentlich wollte ich ja einen , der zwei WLAns simultan kann egal ob physikalisch oder als virtueller Access Point.
Ausserdem sollte am besten Openwrt drauf laufen .
Diesen Alleskönner schien es nicht zu geben weswegen ich einen wrt160N bestellte.
Bekommen hatte ich allerdings einen wrt160NL.

Der Unterschied zwischen den Geräten erschloss sich mir erst beim Stöbern in der englischen wikipedia .
Der wrt160NL hat einen Atheroschip, dies kann VAP ermöglichen !!

Momentan bin ich nach diesem howto dabei, die Firmware zu bauen

Meine bisherigen Schritte

mkdir OpenWrt
cd OpenWrt/
svn co svn://svn.openwrt.org/openwrt/trunk/
cd trunk
svn up

sollte eine Versionsnummer von r17264 oder größer sein

./scripts/feeds update
make defconfig
make package/symlinks
make menuconfig

Im Menü habe ich als Target System ar71xx und als Target Profil wrt160nl eingestellt.
Momentan läuft das

make

noch

Warum WLAN Router übertakten

Author: stephan  |  Category: Linux, Netzwerk, openwrt

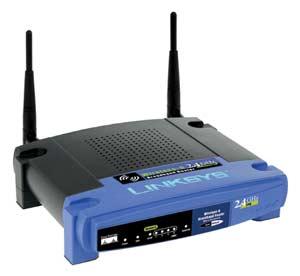
Wie so manch anderer habe ich eine Linux Distribution auf meinen Linux Router , einen Lynksys WRT54G geflasht ( Openwrt)
linksys wrt54g
Nun hatte ich mit manchen clients Verbindungsprobleme und habe gelesen das Übertakten was bringen sollte. Nun , die SB Frequenz ist direkt an die CPU des Routers im Verhältnis 1:2 gekoppelt und dementsprechend profitiert auch die Sendeliestung.

Dazu muß auf der Console folgendes eingegeben werden

nvram set clkfreq=250
nvram commit
reboot